
Ground Assault bike suspension focuses on optimal performance; proper SAG setting is crucial for correct air pressure in air suspension forks. This manual guides owners through setup.
Understanding Suspension Fork Function
Ground Assault suspension forks absorb impacts, enhancing control and comfort. Equalizing air pressure between positive and negative chambers is vital for optimal function. The fork’s ability to compress and rebound efficiently directly impacts rider experience, ensuring a smoother, more controlled ride across varied terrains.
Importance of a Proper Owner’s Manual
A Ground Assault owner’s manual is essential before operating your bike. It details crucial steps for assembly, maintenance, and safe operation. Understanding suspension adjustment, like setting proper SAG, prevents damage and ensures peak performance. Always read the entire manual before riding to maximize enjoyment and safety.
Safety Precautions & Warnings
Always read the entire manual before operation. Incorrect suspension adjustment can lead to loss of control and potential injury; prioritize safety during maintenance.
General Safety Guidelines for Bike Maintenance
Prioritize a clean, well-lit workspace for all maintenance. Wear appropriate safety glasses to protect your eyes. Regularly inspect all components for wear or damage before each ride. Ensure all fasteners are properly tightened to the manufacturer’s specifications. Disconnect power if performing electrical work.
Specific Warnings Regarding Suspension Fork Adjustment
Incorrect air pressure can compromise control and safety. Always equalize pressure between positive and negative chambers before adjustments. Never exceed the maximum pressure rating. Improper adjustments may void the warranty. If unsure, consult a qualified bike mechanic. Regular inspection for leaks is vital for safe operation.
Ground Assault Bike Models & Suspension Types
Ground Assault offers models like the XC 26 and 24, each featuring specific suspension configurations designed for varied terrain and rider preferences.
Ground Assault XC 26 – Suspension Overview
The XC 26 model utilizes a front suspension fork designed for cross-country riding. Achieving optimal performance requires understanding the interplay between positive and negative air chambers within the fork. Equalizing air pressure during setup is vital, compressing the fork 50% of its travel several times. Proper SAG measurement, considering rider weight and equipment, ensures correct air pressure for a responsive and controlled ride.
Ground Assault 24 – Suspension Overview
The Ground Assault 24 features a suspension fork tailored for younger riders, prioritizing control and comfort. Similar to the XC 26, achieving peak performance relies on balanced air pressure within the fork’s chambers. Initial equalization, through compression, is key; Accurate SAG setup, accounting for rider weight, optimizes suspension responsiveness for varied terrain.

Suspension Fork Components
Suspension forks utilize positive and negative air chambers; equalizing pressure between them is vital. Understanding these parts aids in proper adjustment and maintenance procedures.
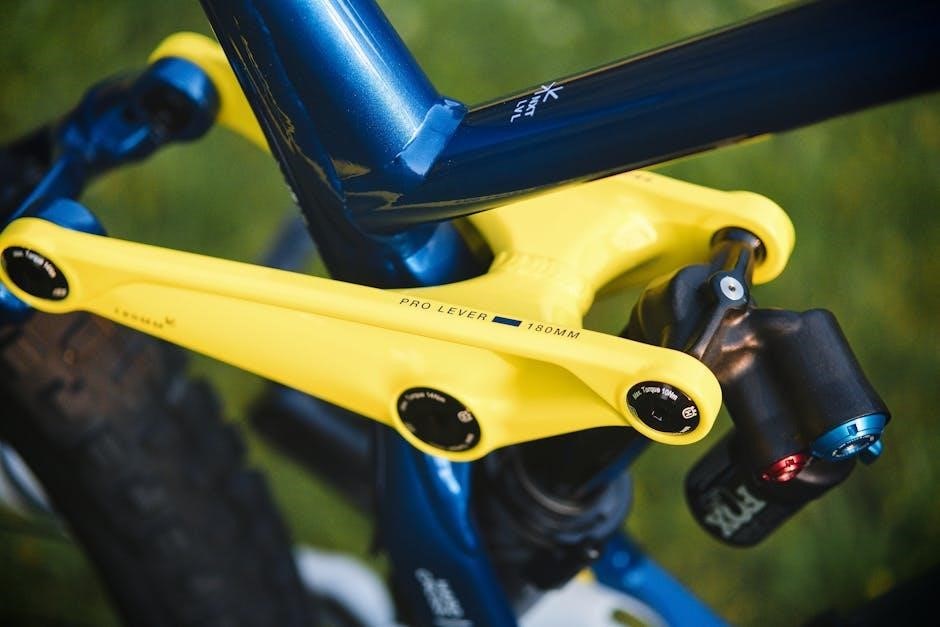
Positive and Negative Air Chambers
Air suspension forks contain both positive and negative air chambers. The positive chamber supports rider weight, while the negative chamber controls initial fork movement and suppleness. Equalizing pressure between these chambers—by compressing the fork—ensures optimal performance and prevents issues like harsh bottom-out or excessive dive. Proper balance enhances control and comfort during rides.
Identifying Key Suspension Parts
Essential components include the suspension fork cap, securing internal parts, and the rear shock cap for rear suspension access. Spokes require reflectors for visibility. Stabilizer feet level the bike. Understanding these parts—and their locations—is vital for maintenance, adjustments, and troubleshooting potential issues, ensuring a safe and enjoyable riding experience.

Setting Proper SAG
Achieving correct SAG involves equalizing air pressure between positive and negative chambers, then measuring fork compression with rider weight applied for optimal performance.
Step 1: Initial Air Pressure Equalization
Begin by setting the suggested air pressure within your suspension fork. Subsequently, vigorously compress the fork through at least 50% of its total travel repeatedly. This crucial action effectively equalizes the air pressure distribution between the positive and negative air chambers, ensuring balanced and consistent suspension performance before SAG measurement.
Step 2: SAG Measurement with Rider Weight
With all riding gear equipped – including a backpack if typically used – carefully sit on the Ground Assault bike. Have an assistant support the bike’s stability. This simulates real-world riding conditions, allowing for accurate SAG measurement, vital for optimizing air pressure and achieving peak suspension responsiveness.
Air Pressure Adjustment
Determining the correct air pressure is essential for optimal performance. Utilize a suspension pump to precisely adjust pressure within the positive and negative chambers.
Determining Correct Air Pressure
Achieving the ideal air pressure directly impacts suspension performance and rider comfort. Begin with the manufacturer’s suggested pressure, then equalize chambers by compressing the fork repeatedly. Account for rider weight and equipment; adjust incrementally based on SAG measurements. Precise pressure ensures optimal responsiveness and control during rides.
Using a Suspension Pump
A dedicated suspension pump is essential for accurate air pressure adjustments. Attach the pump securely to the fork’s valve, ensuring a tight seal. Slowly add or release air, monitoring the pump’s gauge. Incremental adjustments are key; avoid over-inflation. Regularly check pressure for optimal performance and a comfortable ride.
Front Stabilizer Installation & Adjustment
Level your Ground Assault bike using the adjustable feet, loosening locknuts for height changes. Ensure stability by tightening locknuts after achieving desired leveling.
Leveling the Bike with Adjustable Feet
Begin by adjusting the four feet located on the AssaultBike Classic. These feet might be factory-tightened in the lowest position initially. To adjust, use a wrench to loosen the nut on each foot. Rotate the foot to reach the desired height, ensuring the bike sits level on the ground.
Adjusting Foot Height and Tightening Locknuts
Once the desired height is achieved for each foot, securely tighten the locknut against the frame. This prevents unwanted movement during use. View the bike from above to confirm all four feet are adjusted evenly, guaranteeing a stable and balanced riding experience. Re-check tightness periodically.

Gear Shifting Basics
Understanding derailleur function is key; downshifting involves moving the chain inward, while upshifting moves it outward, optimizing power and cadence for varied terrain.
Understanding Front and Rear Derailleurs
Front and rear derailleurs manage chain movement across gear clusters. The front derailleur shifts between chainrings near the pedals, while the rear manages the cassette. Downshifting at the rear appears as an upshift, and vice versa – shifting inward accelerates, outward eases climbing. Mastering these shifts ensures efficient power transfer and a smooth ride.
Downshifting and Upshifting Techniques
Downshifting involves moving to smaller front gears or larger rear gears, easing climbs; Upshifting utilizes larger front gears or smaller rear gears for increased speed on flat terrain. Remember, shifting the chain towards the bike’s centerline aids acceleration, while moving it outward eases pedaling effort. Practice smooth transitions!
Maintenance & Inspection
Regular cleaning of the suspension fork is vital. Inspect frequently for any leaks or damage to ensure continued optimal performance and rider safety.
Regular Cleaning of Suspension Fork
Consistent cleaning extends the life of your Ground Assault suspension. After each ride, wipe down the stanchions with a clean, damp cloth to remove dirt and grime. Avoid harsh chemicals or abrasive cleaners, as these can damage the seals. Inspect for any visible damage during cleaning, ensuring smooth operation.
Checking for Leaks and Damage
Regularly inspect your Ground Assault fork for oil leaks around the seals and stanchions, indicating potential seal failure. Examine the stanchions for scratches or dents, which can compromise performance. Check for any loose bolts or damaged components. Address issues promptly to maintain optimal suspension function and safety.
Removing Suspension Fork Cap
Accessing internal components requires removing the suspension fork cap. Specialized tools are needed for safe removal; consult the parts list for required equipment details.
Accessing Internal Components
Once the suspension fork cap is removed, internal components become accessible for inspection and maintenance. This allows for adjustments to air pressure, damping, and other settings. Carefully note the arrangement of parts before disassembly to ensure correct reassembly. Proper tools prevent damage during this process, maintaining optimal fork performance.
Tools Required for Cap Removal
Removing the suspension fork cap necessitates specific tools for a secure and damage-free process. Typically, a cap wrench, sized to fit the fork’s cap, is essential. Depending on the model, an Allen wrench may also be needed. Ensure the wrench fits snugly to avoid stripping the cap’s threads during removal.
Rear Shock Maintenance
Inspect rear shock components after opening the cap. Regular maintenance ensures optimal performance and extends the lifespan of your Ground Assault bike’s rear suspension.
Opening the Rear Shock Cap
Carefully open the cap of your rear shock to access internal components for inspection and maintenance. This process requires precision to avoid damage. Ensure the bike is stable before beginning. Refer to diagrams for proper cap removal techniques. Always release any remaining air pressure before fully unscrewing the cap, protecting yourself and the shock.
Inspection of Rear Shock Components
Thoroughly inspect all rear shock components for signs of wear, damage, or leaks. Pay close attention to seals, bushings, and the piston rod. Check for any corrosion or unusual play in the moving parts. Document any findings before reassembly, ensuring optimal shock performance and longevity.

Reflector Installation
Mount spoke reflectors opposite each other on the front wheel for visibility. Ensure proper placement enhances rider safety during low-light conditions and nighttime riding.
Mounting Spoke Reflectors
Securely attach spoke reflectors to the front wheel, positioning two directly opposite one another. This configuration maximizes visibility to oncoming traffic and pedestrians. Consistent reflector placement is vital for safety, especially during periods of reduced light or inclement weather. Double-check mounting tightness before each ride.
Proper Reflector Placement for Visibility
Optimal visibility requires two spoke reflectors opposite each other on the front wheel. This ensures coverage from multiple angles. Regularly inspect reflectors for damage or displacement. Proper placement significantly enhances rider safety, particularly during nighttime or low-light conditions, alerting others to your presence on the road.
Carton Contents Verification
Ensure all listed components are present, referencing the parts list. Verify quantities and identify each item before assembly to avoid delays or missing parts.
Ensuring All Parts are Present
Carefully unpack all components and compare them against the detailed parts list included within this manual. Confirm the quantity of each item matches the list. Missing parts can hinder assembly; contact customer support immediately if discrepancies are found. Thorough verification prevents frustration and ensures a smooth build process for your Ground Assault bike.
Identifying Components from the Parts List
Refer to the illustrated parts list to familiarize yourself with each component’s name and corresponding number. This list details everything from the suspension fork itself to smaller hardware like nuts and bolts. Accurate identification is vital during assembly, preventing incorrect part usage and ensuring structural integrity of your Ground Assault bike.

Troubleshooting Common Issues
Address air loss by checking valve cores and seals. Sticking or noisy suspension often requires cleaning and lubrication; inspect for damage promptly.
Addressing Air Loss in Suspension
Consistent air loss indicates a potential issue with the valve core, requiring tightening or replacement. Inspect seals around the stanchion tubes for damage or debris, as these can compromise the airtight seal. Regularly check air pressure before each ride to maintain optimal performance and prevent bottoming out during use.
Dealing with Sticking or Noisy Suspension
Sticking often results from accumulated dirt or dried lubricant; thoroughly clean the stanchion tubes and re-apply appropriate suspension fluid. Noises can indicate air bubbles – compress and release the fork repeatedly. If issues persist, professional servicing is recommended to diagnose and resolve internal component problems.
Warranty Information & Support
Ground Assault bikes are covered by a limited warranty against manufacturing defects. Retain your proof of purchase for warranty claims. For support, consult the complete owner’s manual or contact our customer service team. Detailed information regarding warranty terms and conditions is available on our official website.