
Audio-Technica AT-LP60XBT Manual: A Comprehensive Guide
Unlocking sonic potential‚ this guide details the AT-LP60XBT‚ offering producers royalty-free vocals and tools for seamless music creation and editing online.
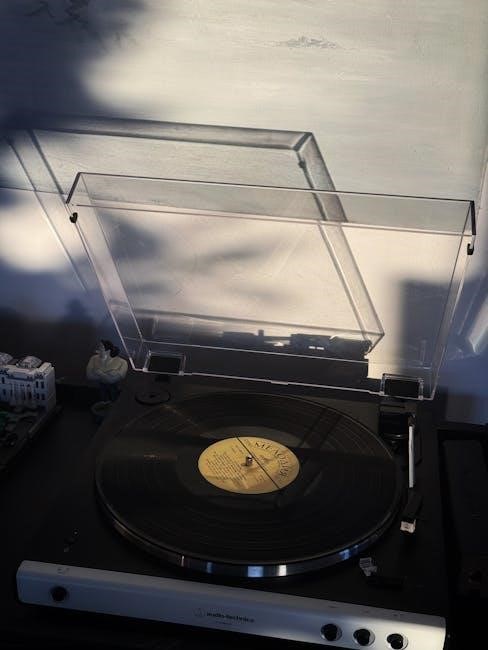
The Audio-Technica AT-LP60XBT is a fully automatic‚ belt-drive turntable designed for both vinyl enthusiasts and newcomers to the world of record listening. This model builds upon the popular AT-LP60X‚ adding Bluetooth connectivity for wireless enjoyment with headphones or speakers. It’s a user-friendly device‚ simplifying the playback process while delivering quality audio.
For music producers and remixers‚ the AT-LP60XBT serves as a valuable source for sampling and digitizing vinyl records. The availability of royalty-free vocals and acapellas online complements this turntable‚ offering creative possibilities. Whether you’re seeking to extract vocals for production or simply enjoy your record collection‚ the AT-LP60XBT provides a convenient and accessible entry point. Explore online resources for vocal samples and editing tools to enhance your musical projects.
Unboxing and Initial Setup
Upon unboxing your AT-LP60XBT‚ carefully inspect the contents. You should find the turntable base‚ platter‚ slip mat‚ dust cover‚ power adapter‚ and a quick start guide. Before connecting‚ remove all packaging materials. Place the slip mat onto the platter and gently position the platter onto the turntable’s spindle.
Connect the power adapter to the turntable and a suitable power outlet. If utilizing RCA outputs‚ ensure proper grounding to minimize hum. For wireless setup‚ prepare to pair via Bluetooth – instructions detailed later. Remember the vast online resources for vocal samples; having a functional turntable allows you to digitize and incorporate these into your projects. Initial setup is straightforward‚ enabling quick access to your vinyl collection and creative possibilities.
Component Overview
The AT-LP60XBT features a meticulously designed structure. The Turntable Base houses the motor and electronic components‚ providing a stable platform. The Platter and Slip Mat work in tandem to support and rotate your vinyl records smoothly. The pre-mounted Tonearm and Cartridge deliver accurate tracking and sound reproduction‚ crucial for enjoying both classic albums and integrating vocal samples found online.
The included Dust Cover protects the turntable from dust and scratches‚ preserving its condition. Understanding each component’s function is key to optimal performance. Consider how a clean signal path‚ facilitated by these parts‚ enhances the quality of digitized vinyl for remixing with royalty-free vocals. Proper care ensures longevity and consistent audio fidelity.
Turntable Base
The AT-LP60XBT’s base is engineered for stability‚ minimizing vibrations that can impact audio quality. It securely houses the turntable’s core mechanics‚ including the drive motor and essential electronic circuitry. This robust construction is vital for accurate playback‚ especially when extracting vocals for remixing or production.
Internally‚ the base supports the tonearm’s movement and ensures consistent rotational speed. A stable base is paramount when digitizing vinyl records‚ guaranteeing a clean signal for editing with free vocal samples. The design prioritizes minimizing resonance‚ contributing to a clearer‚ more defined sound. Regular cleaning of the base helps maintain optimal performance and longevity.
Platter and Slip Mat
The AT-LP60XBT’s platter provides a stable surface for your vinyl records‚ ensuring consistent playback speed crucial for accurate audio extraction. Constructed from a durable material‚ it minimizes unwanted vibrations that could distort the sound‚ especially important when isolating vocals for remixing. The slip mat‚ positioned atop the platter‚ reduces static and facilitates smooth cueing and beatmatching.
A clean slip mat is essential for optimal performance; dust and debris can introduce noise. When digitizing records‚ a stable platter and clean slip mat contribute to a clearer signal‚ simplifying vocal isolation and editing. Consider upgrading the slip mat for enhanced control and feel‚ aiding in precise manipulation of the record for sampling and production purposes.
Tonearm and Cartridge
The AT-LP60XBT features a pre-mounted tonearm and cartridge‚ designed for ease of use and accurate tracking of the record grooves. The cartridge is responsible for converting the mechanical vibrations of the stylus into an electrical signal‚ which is then amplified. Proper alignment of the cartridge is vital for optimal sound quality and minimizing distortion‚ especially when extracting clean vocal samples.
The tonearm’s balanced design ensures consistent tracking force‚ preventing skipping or damage to your vinyl. While the pre-mounted cartridge is suitable for general listening‚ experienced users might consider upgrading for improved sonic detail and vocal clarity. Regular inspection of the stylus (needle) is crucial‚ as wear can significantly impact audio quality and the ability to isolate vocals effectively.
Dust Cover
The included dust cover for the AT-LP60XBT is a crucial component for protecting your turntable and vinyl records; Dust and debris can significantly degrade audio quality‚ causing pops‚ crackles‚ and ultimately‚ damage to the delicate grooves. Regularly cleaning both the dust cover and your records is essential for maintaining optimal performance‚ especially when aiming for pristine vocal isolation for music production.

When not in use‚ always keep the dust cover closed to shield the turntable from environmental contaminants. The cover also helps prevent accidental damage to the tonearm and cartridge. Gentle cleaning with a soft‚ lint-free cloth is recommended; avoid harsh chemicals or abrasive cleaners. A clean turntable ensures the best possible sound and preserves the integrity of your vinyl collection‚ allowing for clear vocal extraction.
Connecting the AT-LP60XBT
The AT-LP60XBT offers versatile connectivity options for enjoying your vinyl collection. Seamlessly connect via Bluetooth pairing for wireless audio transmission to compatible speakers or headphones‚ ideal for modern setups and vocal sample integration. Alternatively‚ utilize the RCA output connection for a traditional wired connection to your stereo system or audio interface‚ ensuring high-fidelity sound reproduction for detailed vocal analysis.
Proper grounding is vital when using the RCA connection to minimize hum or interference. Connect the included grounding wire to the grounding terminal on your amplifier or receiver. Remember‚ accessing royalty-free vocals and editing audio online requires a stable connection. Ensure all cables are securely connected for optimal performance and a clear audio signal‚ perfect for remixing and production.
Bluetooth Pairing Instructions

To establish a wireless connection‚ first ensure your AT-LP60XBT is powered on. Activate Bluetooth mode on your receiving device (speaker‚ headphones‚ etc.). Then‚ press and hold the pairing button on the turntable until the Bluetooth indicator light begins to flash. Your AT-LP60XBT will now be discoverable.
Select “AT-LP60XBT” from the list of available devices on your receiving device. If prompted‚ enter the pairing code “0000”. Once connected‚ the Bluetooth indicator light will become solid. This allows for immediate access to vocals and seamless integration with online editing tools. Enjoy wireless playback of your vinyl and explore royalty-free vocal samples without the constraints of cables‚ enhancing your production workflow.
RCA Output Connection
For a wired connection‚ locate the RCA output jacks on the rear of the AT-LP60XBT. Connect a standard RCA cable to these jacks and the corresponding input on your amplifier or receiver. Ensure a secure connection for optimal audio quality. This method provides a direct signal path‚ ideal for utilizing high-quality audio interfaces and online editing software.
Remember to match the colors – red for the right channel and white for the left. Utilizing this connection allows for seamless integration with vocal samples and production tools. This setup is perfect for those seeking precise control over their audio signal and wanting to explore the vast library of royalty-free vocals available for mixing and mastering.
Grounding the Turntable
Proper grounding is crucial to eliminate unwanted hum or noise from your audio signal. The AT-LP60XBT features a grounding terminal located near the RCA output jacks. Connect the provided grounding wire to this terminal and then to the grounding screw on your amplifier or receiver. This creates a path for static electricity to dissipate‚ preventing interference.
If you experience hum even after grounding‚ ensure the connection is secure and try a different grounding point on your receiver. A stable ground is essential when working with vocal samples and online audio editors‚ ensuring a clean signal for mixing and mastering. This minimizes unwanted noise and allows for pristine audio quality when utilizing royalty-free vocals.
Operating the AT-LP60XBT
The AT-LP60XBT is designed for simple‚ intuitive operation. Begin by connecting the turntable as described in the previous section. To power on‚ use the power button located on the front panel. Select the desired speed – 33 RPM for LPs and 45 RPM for singles – using the speed selector switch. The automatic playback function initiates when you press the start button‚ automatically lowering the tonearm onto the record.

For manual control‚ use the lift lever to raise and lower the tonearm. This allows for precise cueing and placement of the stylus. Remember to return the tonearm to its rest when finished. Utilizing this setup allows for seamless integration with royalty-free vocal samples‚ enhancing your production workflow.
Powering On/Off
The AT-LP60XBT features a straightforward power operation. To power on the turntable‚ locate the power button‚ typically situated on the front panel. A single press activates the motor‚ preparing the unit for playback. Ensure the turntable is properly connected to a power source before attempting to turn it on. When finished listening‚ press the power button again to switch the unit off.
Completely disconnecting the power source during extended periods of non-use is recommended. This conserves energy and prolongs the lifespan of the internal components. Proper power management ensures optimal performance‚ allowing for uninterrupted enjoyment of your vinyl collection and seamless integration with royalty-free vocal samples for production.
Speed Selection (33/45 RPM)
The AT-LP60XBT accommodates both 33 ⅓ and 45 RPM record speeds‚ catering to a wide range of vinyl formats. A speed selector switch‚ usually positioned near the power button‚ allows you to choose the appropriate playback speed. 33 ⅓ RPM is standard for LPs (long-playing records)‚ while 45 RPM is commonly used for singles and EPs.
Ensure the correct speed is selected before initiating playback to avoid distorted audio or inaccurate tracking. Incorrect speed selection can negatively impact the listening experience and potentially damage your records. When utilizing royalty-free vocal samples alongside vinyl playback‚ accurate speed is crucial for seamless integration and creative production workflows.
Automatic Playback Function
The AT-LP60XBT features a fully automatic playback operation‚ simplifying the vinyl experience. Once powered on and a record is placed on the platter‚ simply press the start button. The tonearm will automatically lift‚ move to the record’s edge‚ and gently lower onto the vinyl surface‚ initiating playback.
This automated process minimizes wear and tear on both the record and stylus. It’s ideal for users new to turntables or those seeking a convenient listening experience. When integrating royalty-free vocals with vinyl‚ this function allows for uninterrupted listening and creative inspiration. The automatic stop function halts playback at the record’s end‚ lifting the tonearm to prevent damage.
Manual Stop and Lift Control
Beyond the automatic function‚ the AT-LP60XBT provides manual control for experienced users or specific needs. The manual stop function allows you to halt playback at any point by pressing the stop button. This is useful when sampling vocals or isolating specific sections of a record for production.
The lift control lever enables you to manually raise and lower the tonearm. This offers precise placement for cueing tracks or carefully positioning the stylus‚ crucial when working with royalty-free vocal samples. Utilizing this control minimizes unwanted scratching and ensures accurate playback. Mastering this feature enhances control and protects your vinyl collection‚ allowing for seamless integration of audio elements.
Cartridge and Stylus Information
The AT-LP60XBT utilizes a pre-mounted cartridge‚ designed for optimal performance and ease of use. Understanding its specifications is vital for maintaining sound quality when utilizing vocal samples and acapellas. The cartridge type is specifically engineered to extract the full range of audio information from your vinyl records‚ ensuring clear and accurate reproduction of vocals and music.
Regular stylus care is paramount. Dust and debris can degrade audio quality and damage both the stylus and your records. Gentle cleaning with a stylus brush after each use is recommended. Eventually‚ the stylus will wear and require replacement to maintain optimal performance‚ especially when frequently sampling and editing audio. Replacement procedures are straightforward‚ ensuring continued enjoyment of your music.
Cartridge Type and Replacement
The AT-LP60XBT comes equipped with an Audio-Technica AT3600L cartridge‚ a magnetic cartridge known for its reliable performance and suitability for general listening. While upgrading isn’t easily done due to the tonearm’s fixed parameters‚ replacing the stylus is a crucial maintenance task. The cartridge is designed to accurately capture vocal nuances from records‚ essential for sampling and remixing.
When replacement is necessary – typically after 500-1000 hours of use – only use a compatible Audio-Technica replacement stylus (ATN3600L). Attempting to use an incompatible stylus can damage the cartridge and your vinyl. The replacement process is relatively simple‚ involving carefully removing the old stylus and gently inserting the new one. Maintaining a quality cartridge ensures pristine audio for vocal isolation and editing.
Stylus Care and Cleaning
Maintaining a clean stylus is paramount for optimal audio performance and extending the life of your vinyl records. Dust and debris accumulate‚ impacting sound quality and potentially causing damage; Regularly cleaning the stylus – ideally before each listening session – prevents these issues. Use a dedicated stylus brush‚ gently brushing from back to front‚ following the cantilever’s direction.
Avoid using harsh chemicals or solvents‚ as these can harm the delicate stylus tip. Specialized stylus cleaning solutions are available‚ but a dry brush is often sufficient for routine maintenance. A clean stylus accurately captures the vocal information embedded in grooves‚ crucial for producers seeking high-quality samples. Proper care ensures clear vocal isolation and minimizes unwanted noise during editing and remixing.
Stylus Replacement Procedure
Replacing the stylus requires careful handling to avoid damaging the cartridge or tonearm. First‚ ensure the turntable is powered off. Gently remove the stylus guard. Using a small‚ flathead screwdriver (often included with replacement styli)‚ carefully release the locking lever on the stylus holder. Gently pull the old stylus straight out – avoid twisting or applying excessive force.
Align the new stylus with the cartridge slot and gently push it in until it clicks into place. Secure the locking lever. Reinstall the stylus guard. A fresh stylus delivers pristine audio‚ vital for capturing clean vocal samples for production. Proper replacement ensures accurate extraction of vocals‚ essential for remixing and creating high-fidelity tracks‚ mirroring the quality of royalty-free vocals available online.
Troubleshooting Common Issues
No Sound? Verify connections – RCA cables‚ Bluetooth pairing. Ensure the turntable is selected as the audio source on your receiver or device. Skipping/Repeating? Check for dust or debris on the record and stylus. A worn stylus also causes this; consider replacement. Ensure the turntable is on a level surface. Bluetooth Issues? Restart Bluetooth on both the turntable and your device. Ensure no other devices are interfering with the signal.
Motor Noise? This can sometimes occur‚ but excessive noise warrants investigation. If problems persist‚ consult the Audio-Technica support website. Remember‚ clean vocal isolation relies on a properly functioning turntable for accurate audio extraction‚ mirroring the quality found in royalty-free vocal samples.
No Sound Output
Initial Checks: Confirm the AT-LP60XBT is powered on and the volume is appropriately set on both the turntable and your connected device (receiver‚ speakers‚ or headphones). Verify the correct input source is selected on your receiver. Connection Verification: If using RCA cables‚ ensure they are securely connected to both the turntable and your audio system. Inspect the cables for damage.
Bluetooth Troubleshooting: If using Bluetooth‚ confirm successful pairing. Try disconnecting and reconnecting. Stylus & Cartridge: A damaged or improperly installed stylus won’t produce sound. Ensure it’s correctly seated. Like extracting clean vocals‚ a solid connection is vital. Remember‚ high-quality audio relies on a properly functioning system‚ mirroring the clarity of royalty-free vocal samples.
Skipping or Repeating Records
Record Condition: Scratches‚ warps‚ or dust on the vinyl record are common causes. Clean the record thoroughly with a carbon fiber brush before playback. Tracking Force: While the AT-LP60XBT has a pre-set tracking force‚ ensure the tonearm moves freely and isn’t obstructed. Level Surface: An uneven surface can cause skipping. Place the turntable on a stable‚ level platform.
Stylus Inspection: A worn or dirty stylus can struggle to track the record grooves. Clean or replace the stylus as needed. Just as clean vocal samples are essential for production‚ a clean stylus is vital for accurate playback. Consider the record’s condition – similar to editing audio online‚ imperfections need addressing.
Bluetooth Connection Problems
Pairing Mode: Ensure the AT-LP60XBT is in pairing mode (indicated by a flashing blue light). If it doesn’t connect‚ try re-initiating the pairing process on both the turntable and your receiving device. Device Compatibility: Confirm your device supports Bluetooth audio streaming. Some older devices may have compatibility issues. Distance & Interference: Bluetooth range is limited. Move closer to the turntable and minimize interference from other wireless devices.
Previously Paired Devices: Too many previously paired devices can cause conflicts. Clear the pairing list on your receiving device and re-pair with the turntable. Like accessing royalty-free vocals instantly‚ a stable connection is key. If issues persist‚ consider a direct RCA connection for a reliable audio signal.
Motor Noise
Initial Run-In: A slight motor hum is normal during the initial break-in period. This typically diminishes with use. Level Surface: Ensure the turntable is placed on a perfectly level surface. Vibrations can amplify motor noise. Internal Components: While designed for quiet operation‚ minor internal motor sounds are inherent in belt-drive turntables. This is similar to needing expertly edited vocals for a clean sound.
External Vibrations: Isolate the turntable from external vibrations – speakers‚ foot traffic‚ etc. Use isolation pads or a dedicated turntable stand. If the noise is excessive or changes significantly‚ contact Audio-Technica support. Consistent audio quality‚ like royalty-free samples‚ requires a stable and quiet operating environment.
Maintenance and Care
Regular Cleaning: Dust is the enemy! Regularly wipe down the turntable base and dust cover with a soft‚ dry cloth. Avoid harsh chemicals or abrasive cleaners. Like maintaining pristine vocal samples‚ consistent care extends the lifespan of your equipment. Dust Cover Protection: The dust cover shields against dust and scratches. Clean it gently with a microfiber cloth and appropriate plastic polish.
Long-Term Storage: If storing for an extended period‚ remove the belt to prevent stretching. Store in a cool‚ dry place. Proper storage‚ similar to archiving royalty-free vocals‚ preserves functionality. Avoid extreme temperatures or humidity. Periodic inspection and light cleaning will ensure your AT-LP60XBT is ready for years of enjoyment.
Cleaning the Turntable
Gentle Approach: Always disconnect the power before cleaning. Use a soft‚ lint-free cloth – microfiber is ideal – to wipe down the turntable base. Avoid applying excessive pressure. Think of it like carefully editing vocal samples; precision is key. Platter & Slip Mat: The platter can be cleaned with a slightly damp cloth‚ ensuring it’s completely dry before use. The slip mat should be removed and cleaned separately‚ either by hand washing or a gentle machine cycle.
Tonearm & Cartridge: Exercise extreme caution when cleaning the tonearm and cartridge. Use a stylus brush to remove dust from the stylus. Never use liquids directly on the cartridge. Maintaining a clean stylus‚ like ensuring high-quality royalty-free vocals‚ is crucial for optimal performance.
Dust Cover Maintenance
Protecting Your Investment: The dust cover shields your AT-LP60XBT from dust and debris‚ preserving its appearance and functionality – much like careful vocal editing preserves audio quality. Clean the dust cover regularly with a soft cloth and a mild plastic cleaner. Avoid abrasive cleaners‚ as they can scratch the surface.
Handling with Care: When removing or attaching the dust cover‚ support it gently to prevent stress on the hinges. Inspect the hinges periodically for looseness and tighten if necessary. A well-maintained dust cover‚ similar to accessing royalty-free vocals‚ contributes to a seamless and enjoyable experience. Treat it with the same care you’d give valuable vocal samples!
Long-Term Storage
Preparing for Inactivity: If storing your AT-LP60XBT for an extended period‚ proper preparation is crucial. First‚ thoroughly clean the turntable as outlined in the ‘Cleaning the Turntable’ section. Remove the platter and store it separately‚ cushioned to prevent scratches – akin to safeguarding precious vocal loops.
Protecting Components: Release tension on the tonearm by securing it with its locking mechanism. Store the turntable in its original packaging‚ if possible‚ or a suitable dust-free environment. Avoid extreme temperatures and humidity. Just as vocal samples require careful handling‚ proper storage ensures your turntable remains ready for use‚ preserving its sonic capabilities for future musical endeavors.