SRAM Guide R Brakes: A Comprehensive Guide
SRAM Guide R brakes deliver reliable stopping power for mountain biking adventures‚ offering a balance of performance and affordability. These hydraulic disc brakes
are popular among riders seeking consistent modulation and control on diverse terrains. Understanding the nuances of installation‚ bleeding‚ and maintenance ensures optimal functionality and longevity.
SRAM Guide R brakes represent a cornerstone in the world of mountain biking‚ providing a robust and dependable braking solution for a wide spectrum of riders. Positioned within the SRAM Guide series‚ the Guide R model strikes an excellent balance between performance capabilities and cost-effectiveness‚ making it a favored choice for trail enthusiasts and intermediate riders alike.
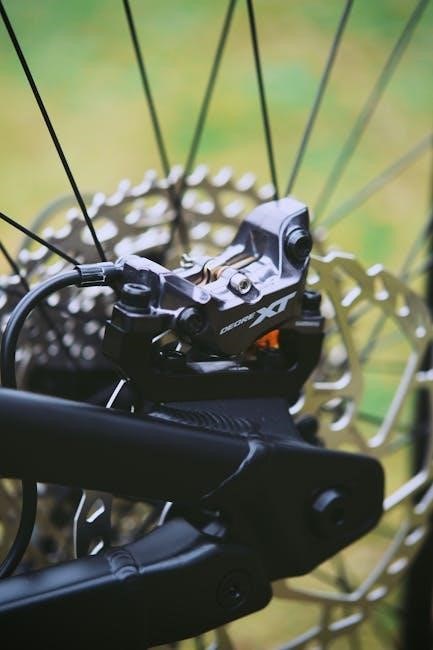
These hydraulic disc brakes are engineered to deliver consistent stopping power and precise modulation‚ enhancing control and confidence on varied terrain. The Guide R utilizes SRAM’s proven four-piston caliper design‚ ensuring ample braking force even in demanding conditions. They are known for their relatively simple maintenance and readily available parts‚ contributing to their enduring popularity. Understanding the core features and benefits of the Guide R is crucial for maximizing its potential on the trails.
Understanding the SRAM Guide Series
The SRAM Guide series encompasses a range of hydraulic disc brakes designed to cater to diverse mountain biking needs and budgets. From the top-tier Guide RSC‚ offering maximum adjustability and refinement‚ to the more accessible Guide R and Guide RS‚ the series provides options for every rider. The Guide brakes share a common platform‚ featuring SRAM’s four-piston caliper and ergonomic lever designs.
The Guide R sits in the middle ground‚ delivering a solid performance without the premium features of the RSC. Key distinctions between models lie in lever adjustability‚ caliper materials‚ and overall weight. All Guide brakes utilize DOT 5.1 fluid‚ requiring specific bleeding procedures. Understanding the hierarchy within the Guide series helps riders select the brake that best aligns with their riding style and financial considerations.
Installation Process
Proper SRAM Guide R brake installation involves careful component checks‚ secure lever mounting‚ precise caliper positioning‚ and correct hose routing for optimal performance.
Unboxing and Component Check
Upon receiving your SRAM Guide R brakes‚ a thorough unboxing and component check is crucial before beginning the installation process. Carefully inspect the box for any signs of damage during shipping. Once opened‚ verify that all listed components are present‚ including the brake levers‚ calipers‚ brake hoses‚ brake pads‚ mounting hardware‚ and any included accessories like olive and barb inserts.
Examine each component for defects or damage. Check the levers for smooth action and any visible cracks. Inspect the calipers for piston movement and ensure the mounting bolts are present. Confirm the brake hoses are free from kinks or punctures. Verify the brake pads are the correct type for your rotors and are in good condition. Missing or damaged parts should be addressed with the retailer before proceeding‚ ensuring a successful and safe installation.
Lever Installation
Lever installation for SRAM Guide R brakes begins with ensuring your handlebar is clean and free of debris. Position the lever clamp on the handlebar‚ considering your preferred reach and angle. Lightly tighten the clamp bolts to allow for adjustment. Before fully securing‚ test the lever position to confirm comfortable access and ergonomic control.
Once satisfied with the placement‚ torque the clamp bolts to the manufacturer’s specified value – typically around 6-8 Nm – using a torque wrench. Avoid over-tightening‚ which can damage the handlebar or clamp. After tightening‚ verify the lever moves smoothly and doesn’t interfere with any other handlebar-mounted accessories. Finally‚ ensure the lever blade is correctly aligned for optimal braking performance.
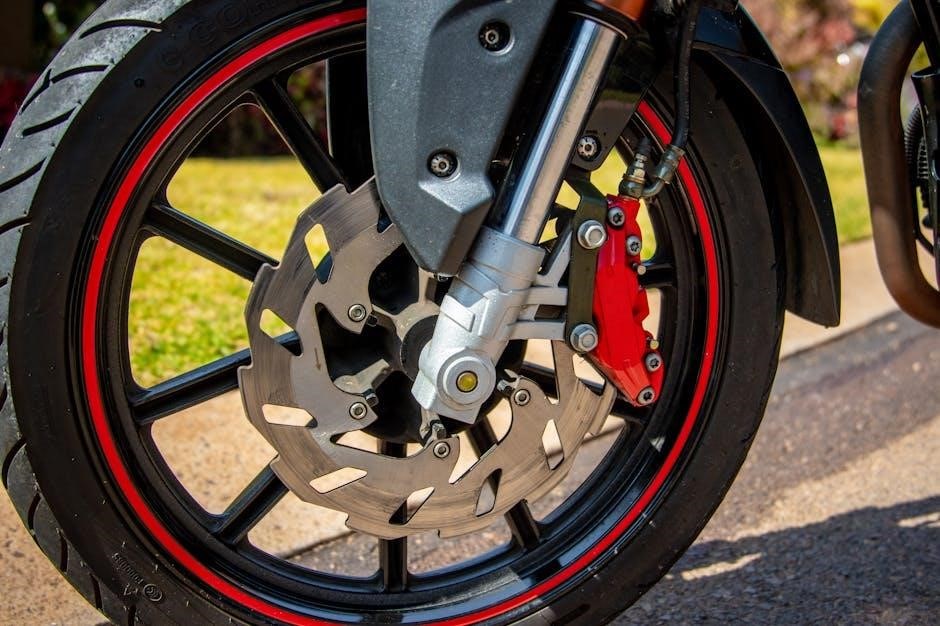
Calipers Mounting
Calipers mounting for SRAM Guide R brakes requires careful attention to alignment and secure fastening. Begin by loosely attaching the caliper to the frame or fork using the appropriate mounting bolts. Ensure the caliper is positioned so the brake pads will contact the rotor squarely. It’s crucial to avoid cross-threading the bolts during this initial phase.
Next‚ center the caliper over the rotor. You can achieve this by gently squeezing the brake lever while observing the pad alignment. Once centered‚ torque the mounting bolts to the manufacturer’s specification – generally around 8-10 Nm – using a torque wrench. Double-check that the caliper remains centered after tightening. Proper caliper mounting is vital for consistent braking and preventing rotor rub.
Brake Hose Routing and Cutting
Brake hose routing for SRAM Guide R brakes is critical for optimal performance and preventing leaks. Route the hose smoothly‚ avoiding sharp bends or kinks that can compromise fluid flow. Secure the hose to the frame using cable ties or dedicated hose guides‚ ensuring it doesn’t interfere with steering or suspension movement.
When cutting the hose to length‚ use a proper hose cutter to achieve a clean‚ square cut. Measure carefully‚ accounting for insertion into the caliper and lever. After cutting‚ thoroughly deburr the inside of the hose to prevent contamination. Always use SRAM-approved fittings and olive inserts during reassembly. Incorrect hose length or a poor cut can lead to reduced braking power and potential failure.
Brake Pad Installation
Brake pad installation for SRAM Guide R brakes requires careful attention to detail. Begin by removing the old pads‚ noting their wear pattern. Clean the caliper thoroughly‚ removing any debris or contaminants. Insert the new pads‚ ensuring they are correctly seated within the caliper pistons.
Often‚ you’ll need to pry the pistons back to create enough space for the new‚ thicker pads; be gentle to avoid damaging them. Use a pad spreader tool for even pressure. Once installed‚ squeeze the brake lever to center the pads against the rotor. Verify proper pad contact and alignment‚ ensuring full rotor coverage. Using SRAM-approved pads guarantees compatibility and optimal braking performance.

Bleeding SRAM Guide R Brakes
Bleeding SRAM Guide R brakes removes air bubbles from the hydraulic system‚ restoring firm lever feel and consistent braking power. This process is crucial for optimal performance.
Tools Required for Bleeding
Successfully bleeding SRAM Guide R brakes necessitates gathering specific tools to ensure a clean and efficient process. Firstly‚ a SRAM bleed kit is highly recommended‚ containing syringes‚ adapters‚ and tubing designed specifically for their brake systems. DOT 5.1 brake fluid is essential; never use DOT 3 or mineral oil.
You’ll also need a T25 Torx wrench for removing the lever and caliper‚ along with clean rags to wipe up any spilled fluid. A small container to collect the old brake fluid is also necessary. Some mechanics prefer using a dedicated bleed block to prevent the pistons from extending too far during the process. Gloves and eye protection are crucial for safety‚ as brake fluid can be corrosive. Finally‚ a clean workspace will help maintain contamination-free operation.
Preparing the Brake System for Bleeding
Prior to bleeding your SRAM Guide R brakes‚ meticulous preparation is key for a successful outcome. Begin by ensuring the brake system is clean‚ removing any dirt or debris from around the lever and calipers. Fully extend the brake lever and secure it in this position – a bleed block is ideal for this.
Remove the brake pads to prevent contamination and allow for better fluid flow. Inspect the brake lines for any cracks or damage‚ replacing them if necessary. Ensure the fluid reservoir on the lever is clean and accessible. Finally‚ loosen the caliper bleed port screw slightly‚ but do not remove it completely. This prepares the system for fluid evacuation and replacement‚ setting the stage for optimal brake performance.
Bleeding Procedure ‒ Step-by-Step
Begin the SRAM Guide R bleeding process by connecting the bleed syringe‚ filled with fresh DOT 5.1 fluid‚ to the caliper bleed port. Slowly push a small amount of fluid through‚ checking for bubbles. Next‚ open the lever fluid port and draw fluid from the lever reservoir into a separate syringe. Repeat this process – pushing fluid to the caliper and drawing it from the lever – multiple times.
Continue until no more bubbles appear in the fluid. Close both ports‚ ensuring they are snug but not overtightened. Gently pump the brake lever several times to distribute the fluid evenly. Regularly check the fluid level in the lever reservoir‚ topping it off as needed. This methodical approach eliminates air and restores optimal braking performance.
Post-Bleed Check and Adjustment
Following a successful SRAM Guide R bleed‚ thoroughly inspect the brake system for any leaks around the caliper and lever connections. Ensure all fittings are secure and tightened appropriately. Carefully pump the brake lever repeatedly‚ verifying a firm and consistent feel throughout the entire range of motion. If the lever feels spongy‚ repeat the bleeding procedure.
Next‚ check for proper pad clearance and rotor alignment. Spin the wheel and observe the rotor’s path relative to the pads; any rubbing indicates misalignment. Adjust the caliper mounting bolts to center the caliper and eliminate rotor contact. Finally‚ fine-tune the lever reach and bite point for personalized control and optimal braking performance.

Adjustment and Fine-Tuning
Precise adjustments optimize SRAM Guide R brake performance‚ enhancing control and rider confidence. Dialing in reach‚ bite point‚ and alignment delivers a personalized braking experience.
Lever Reach Adjustment
SRAM Guide R lever reach adjustment allows riders to customize the distance between the handlebar and the lever blade‚ catering to various hand sizes and preferences. This is crucial for achieving optimal braking control and comfort. Locate the reach adjustment dial‚ typically found on the lever body near the handlebar clamp.
Turning the dial clockwise decreases the reach‚ bringing the lever closer to the handlebar – ideal for riders with smaller hands. Conversely‚ turning it counter-clockwise increases the reach‚ moving the lever further away‚ suiting those with larger hands.
Ensure the adjustment is made incrementally‚ testing the feel after each small change. A properly adjusted lever allows for confident‚ one-finger braking without overextending or feeling cramped. If your lever has a contact point adjustment‚ fully wind it out before measuring reach.
Bite Point Adjustment
SRAM Guide R brakes feature bite point adjustment‚ allowing riders to fine-tune when the brakes engage during the lever pull. This impacts braking power and modulation. The bite point adjustment dial‚ usually located on the lever body‚ controls the volume of fluid displaced to the calipers.
Turning the dial clockwise moves the bite point further into the lever stroke‚ resulting in a later‚ softer initial engagement and potentially more power. Counter-clockwise rotation brings the bite point closer to the handlebar‚ offering a quicker‚ firmer initial bite and enhanced modulation.
Experiment to find the sweet spot that suits your riding style and terrain. A later bite point is beneficial for steep descents‚ while an earlier bite point provides responsiveness for technical trails.
Rotor Alignment
SRAM Guide R brake performance relies heavily on proper rotor alignment. Misaligned rotors cause rubbing‚ noise‚ and reduced braking power. To check alignment‚ spin the wheel and observe the gap between the brake pads and the rotor. The gap should be consistent around the entire rotor circumference.
If rubbing occurs‚ loosen the caliper mounting bolts slightly. Then‚ squeeze the brake lever firmly and hold it while tightening the bolts. This centers the caliper over the rotor. For persistent rubbing‚ use a rotor truing tool to gently bend the rotor back into alignment.
Ensure the rotor isn’t bent or warped. A severely damaged rotor requires replacement. Accurate alignment minimizes friction‚ maximizes stopping power‚ and extends pad life.
Pad Contact Adjustment
SRAM Guide R brakes require precise pad contact adjustment for optimal braking performance. Initially‚ with the lever fully released‚ the brake pads should not contact the rotor. If they do‚ back off the lever adjustment dial (if equipped) fully. Then‚ slowly re-introduce contact by turning the dial until the pads lightly touch the rotor.
Squeeze the brake lever firmly several times to bed the pads in. This ensures full contact with the rotor surface. Check for even pad contact; both pads should engage simultaneously. Uneven contact indicates a need for caliper centering or pad adjustment.
Proper pad contact maximizes stopping power and minimizes brake noise. Regular checks and adjustments are crucial for maintaining consistent braking performance.

Maintenance and Troubleshooting
SRAM Guide R brakes demand regular cleaning and inspection for peak performance. Addressing common issues like lever feel or pad wear promptly ensures safe‚ reliable braking.
Regular Cleaning and Inspection
SRAM Guide R brake maintenance begins with frequent cleaning; after each ride‚ wipe down the levers and calipers with a soft cloth to remove dirt and grime. Inspect brake pads for wear‚ replacing them when they reach the wear indicators.
Check brake hoses for any cracks‚ abrasions‚ or leaks‚ as damage compromises braking performance. Regularly examine rotor surfaces for contamination or warping‚ cleaning them with isopropyl alcohol if needed. Ensure all mounting bolts are securely tightened‚ but avoid over-tightening.
Periodically inspect the bleed port screws for tightness to prevent air from entering the system. A proactive approach to cleaning and inspection extends the lifespan of your SRAM Guide R brakes and maintains optimal stopping power.
Identifying Common Issues
SRAM Guide R brakes can exhibit several common issues; spongy lever feel often indicates air in the system‚ requiring a bleed. Rattling noises may stem from loose brake pads or caliper mounting bolts‚ demanding tightening or inspection. Reduced braking power can signal contaminated brake pads or rotors‚ necessitating cleaning or replacement.
Uneven pad wear suggests rotor misalignment or caliper issues‚ requiring adjustment. If the lever pulls to the handlebar‚ it could indicate a sticking piston within the caliper‚ needing cleaning or rebuilding. Difficulty modulating braking force points towards air bubbles or fluid contamination.
Addressing these issues promptly ensures continued safe and effective braking performance with your SRAM Guide R system.
Replacing Brake Pads

SRAM Guide R brake pad replacement is a straightforward maintenance task. First‚ remove the wheel and carefully push the pistons back into the caliper using a suitable tool. Next‚ unbolt the caliper from the frame or fork‚ allowing access to the brake pads. Remove the old pads‚ noting their orientation for correct installation of the new ones.
Clean the caliper thoroughly‚ removing any debris or contaminants. Insert the new SRAM brake pads‚ ensuring they are seated correctly and secured with the retaining clip or bolt. Reinstall the caliper‚ tighten the mounting bolts to the specified torque‚ and reattach the wheel.
Finally‚ bed the new pads in by performing several controlled stops to transfer material onto the rotor‚ optimizing braking performance.
Troubleshooting Brake Lever Feel
SRAM Guide R brake lever feel issues often stem from air in the system or contaminated fluid. A spongy or inconsistent feel typically indicates air‚ requiring a bleed. If the lever pulls all the way to the handlebar‚ check for leaks in the hoses or at the caliper connections. A firm‚ but weak‚ feel might suggest contaminated fluid‚ necessitating a full fluid flush and bleed.
Ensure the lever’s contact point adjustment is correctly set; winding it out fully before adjustments can resolve some issues. If the lever feels gritty‚ inspect the pivot bearings and bushings for wear or contamination. Regularly cleaning and lubricating these components can restore smooth operation.
Always prioritize a thorough bleed before replacing components.
Upgrades and Compatibility
SRAM Guide R brakes offer rotor and lever blade upgrade options for personalized performance. Compatible rotors enhance braking‚ while fluid choices impact feel and power.
Rotor Options and Compatibility
SRAM Guide R brakes demonstrate compatibility with a wide array of rotor sizes and types‚ allowing riders to tailor braking performance to their specific needs and riding style. Rotor size significantly influences stopping power and heat dissipation; larger rotors generally provide more power but can be heavier.
Common rotor sizes for the Guide R include 160mm‚ 180mm‚ 200mm‚ and 220mm. Riders should consider their weight‚ riding terrain‚ and bike geometry when selecting a rotor size. SRAM Centerline rotors are a direct replacement and are available in various materials‚ including stainless steel and Centerline X with improved heat management.
Third-party rotors adhering to the SRAM brake standard are also compatible‚ but ensure proper fitment and consider potential differences in noise or performance. Always verify the rotor’s mounting style (6-bolt or Center Lock) matches your hub’s compatibility before purchasing.
Lever Blade Options
SRAM Guide R brake lever blades offer customization options to enhance rider comfort and control. While the stock lever blade provides a functional grip‚ aftermarket options cater to preferences for ergonomics and aesthetics. Shorty lever blades are popular among riders with smaller hands‚ reducing reach and improving modulation.
Longer lever blades can offer increased leverage‚ potentially beneficial for riders who prefer a more powerful braking feel. Several manufacturers produce compatible lever blades‚ often constructed from aluminum for lightweight durability. Consider the blade’s texture and shape for optimal grip in various conditions.
Replacing the lever blade is a straightforward process‚ typically requiring only a hex key. Ensure the chosen blade is specifically designed for SRAM brakes to guarantee proper fitment and function. Upgrading the lever blade can significantly improve the overall braking experience.
Brake Fluid Considerations
SRAM Guide R brakes require specific brake fluid for optimal performance and longevity. SRAM recommends using DOT 5.1 brake fluid‚ as it offers a higher boiling point than DOT 4‚ reducing the risk of brake fade during intense riding. Using incorrect fluid can damage the seals and compromise braking power.
Brake fluid is hygroscopic‚ meaning it absorbs moisture from the air over time. Moisture contamination lowers the boiling point‚ leading to spongy brake feel and reduced effectiveness. Regular brake bleeding—typically annually‚ or more frequently in wet conditions—removes old fluid and replenishes with fresh fluid.
Always store brake fluid in a sealed container to prevent moisture absorption. When bleeding‚ avoid introducing air into the system. Proper fluid maintenance is crucial for consistent and reliable braking performance with your SRAM Guide R brakes.